Introduction
A proper axolotl tank setup is the difference between a thriving pet that lives 10-15 years and one that develops stress-related health problems within weeks. I’ve seen too many new owners rush their setup — skipping the nitrogen cycle, using gravel instead of sand, or putting their axolotl in a tank that’s too small — and the results are predictable. Axolotls are hardy, but their environment has specific requirements that don’t tolerate shortcuts.
This axolotl tank setup guide covers everything from choosing the right tank to cycling and introducing your axolotl. For the complete care picture beyond tank setup — feeding, health, handling, and behavior — see our axolotl care guide.
Axolotl Tank Setup Checklist
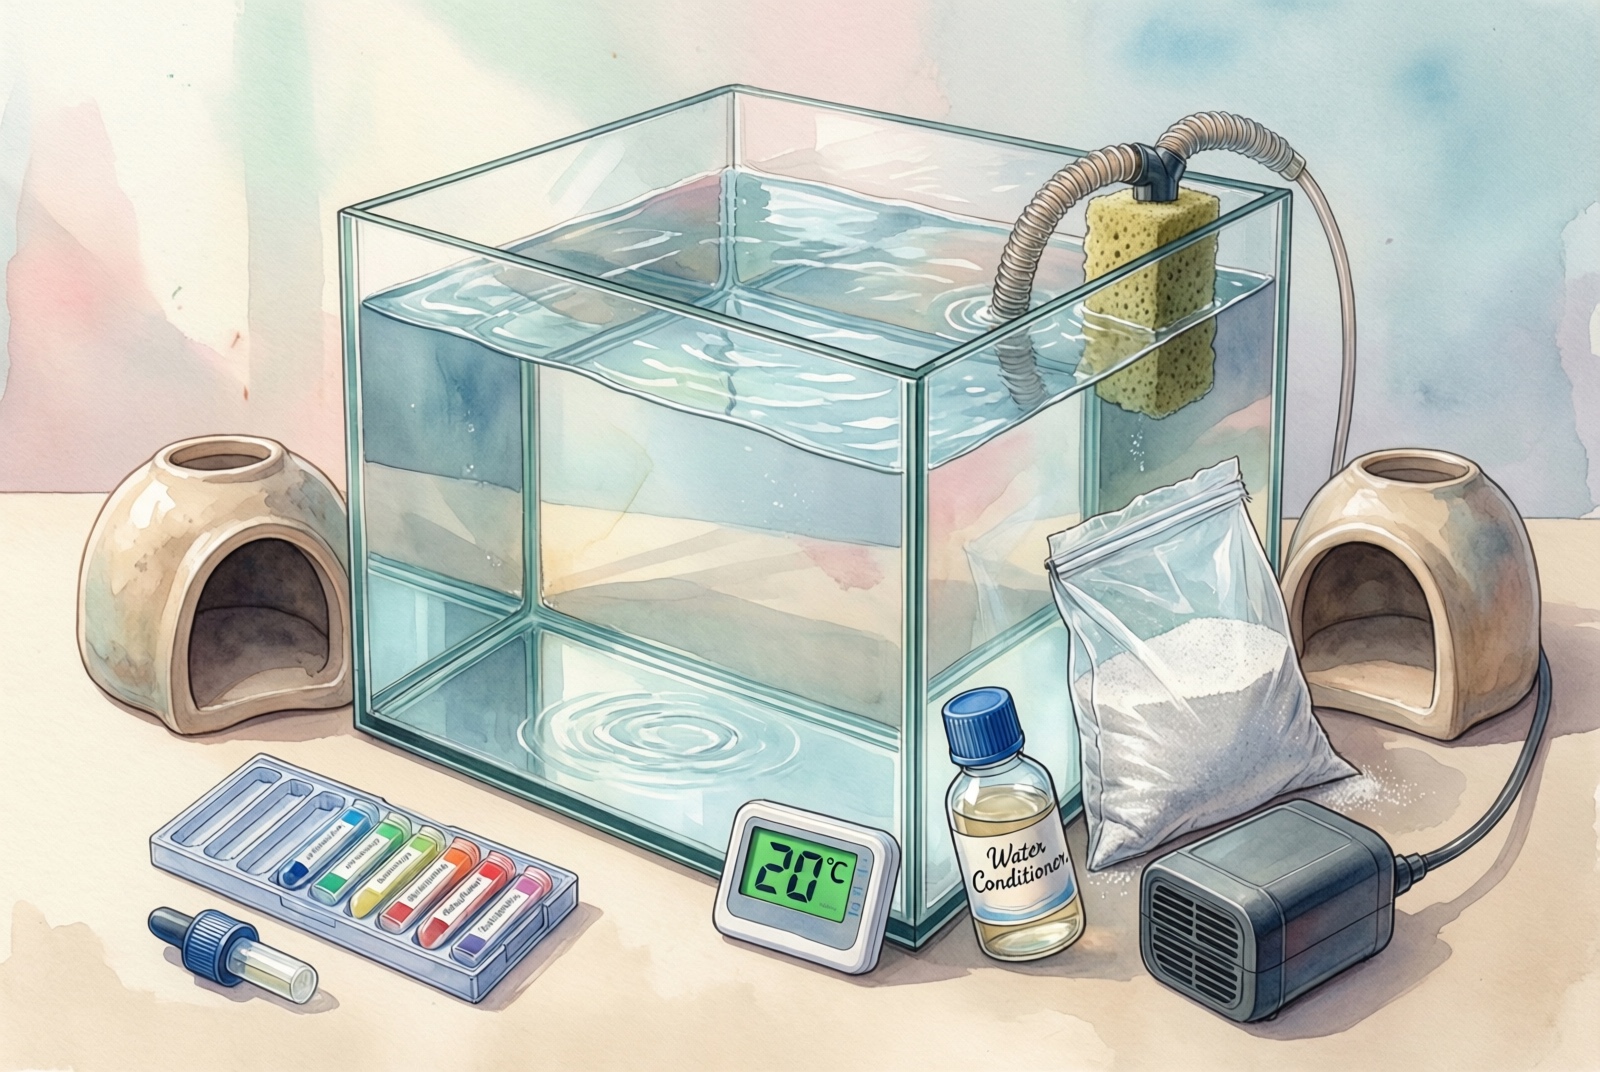
Before diving into specifics, here’s the complete axolotl tank setup list of everything you need. Gather it all before you start — there’s nothing worse than realizing you’re missing a critical component halfway through.
Essential equipment:
- ✅ Tank: 20-29 gallon minimum for an adult (more on sizing below)
- ✅ Filter: Sponge filter or canister filter with gentle flow
- ✅ Substrate: Fine sand only — never gravel
- ✅ Water conditioner: Seachem Prime or equivalent — tap water is toxic without treatment
- ✅ Thermometer: Digital or floating, to monitor temperature daily
- ✅ Air pump: Required if using a sponge filter (not included with most)
- ✅ Hides: At least 2 hiding spots, smooth-edged only
Recommended:
- Water test kit (API Freshwater Master Test Kit)
- Gravel vacuum for substrate cleaning
- Timer for lights
Optional:
- Aquarium chiller (if room exceeds 72°F)
- Cooling fan for the water surface
- Net for acclimation
Timeline: Start your axolotl tank setup at least 4-6 weeks before getting your axolotl. The nitrogen cycle takes 3-6 weeks, and skipping it is the number one mistake that kills new axolotls. Plan accordingly.
Axolotl Tank Size Requirements
Tank size is the foundation of any axolotl tank setup. Water quality degrades rapidly in undersized tanks, and axolotls need horizontal space for comfortable swimming. Understanding axolotl tank size requirements before you buy will save you from having to upgrade — and re-cycle — a tank that’s too small. For specific tank product recommendations, see our best axolotl tanks guide.
| Axolotl Size | Minimum Tank | Recommended Tank | Dimensions | Notes |
|---|---|---|---|---|
| Juvenile (2-4”) | 10 gallon | 10-20 gallon | 20”×10”×12” | Temporary only — upgrade at 6” |
| Adult (6-10”) | 20 gallon | 29 gallon | 30”×12”×12” | Long-term minimum |
| Large Adult (10”+) | 29 gallon | 40+ gallon | 36”×18”×16” | Ideal for large adults |
| 2 Axolotls | 40 gallon | 55+ gallon | 36”×18”×16” | Each needs 20+ gallons |
Long tanks over tall tanks: Axolotls spend 95% of their time on the substrate, walking along the bottom or resting in hides. Extra vertical height is wasted and doesn’t benefit your axolotl at all. A 20-gallon long tank (30”×12”×12”) provides far more usable swimming space than a 20-gallon tall tank (24”×12”×16”). When shopping for your axolotl tank setup, look for “breeder” or “long” tank dimensions.
One axolotl per tank is strongly recommended. While some experienced keepers house pairs successfully, axolotls are territorial and juveniles have a documented tendency toward cannibalism — limbs and gills get nibbled. Two adults in a 40+ gallon tank can work if they’re similar in size and raised together, but I’d only attempt this if you have experience and a backup plan to separate them. For ongoing care requirements, see our axolotl care guide.
Glass versus acrylic: Glass tanks are cheaper, easier to find, and more scratch-resistant. Acrylic tanks are lighter (important for larger setups), clearer, and better insulated, but they scratch easily and cost significantly more. For a first axolotl tank setup, glass is the practical choice.
If you want an all-in-one solution, the Aqueon Aquarium Starter Kit includes a 20-gallon tank, filter, LED lighting, and heater. At $189.99 with over 2, it’s convenient for beginners. However, the LED lights have a reputation for failing within a few months, and the built-in filter may not provide enough biological filtration for an axolotl’s waste output — I’d supplement with a sponge filter. The included heater is unnecessary since axolotls prefer cool water.
Aqueon Aquarium Starter Kit on Amazon
20-Gallon Axolotl Tank Setup
A 20-gallon long tank is the sweet spot for beginners setting up their first axolotl tank. The 30”×12” footprint gives a single adult axolotl plenty of room to walk along the bottom, and the relatively small water volume makes parameter management straightforward. When people ask about a 20 gallon axolotl tank setup, this is what I recommend — a simple, affordable, and effective configuration.
Why 20-gallon long works: The “long” designation means the tank prioritizes horizontal space — exactly what a bottom-dwelling axolotl needs. At roughly $40-60 for a basic glass tank, it’s also one of the most affordable options for a 20 gallon axolotl tank setup.
Equipment sizing for a 20-gallon setup:
- Filter: One sponge filter (medium size) is sufficient for a single axolotl in 20 gallons. The hygger Double Sponge Filter handles this volume well.
- Substrate: 5-10 pounds of fine sand (1-2 inches deep)
- Hides: Two hides on opposite ends — one ceramic cave and one PVC pipe work well
- Air pump: A standard single-output air pump ($10-15)
Limitations: If your axolotl grows past 10 inches (some reach 12-14”), a 20-gallon long starts feeling tight. The upgrade path is straightforward — move to a 29-gallon tank, which adds 50% more water volume and floor space without significantly increasing the footprint.

The setup above shows a properly configured 20-gallon long tank with the essentials: sponge filter in the back corner, fine sand substrate, two hiding spots on opposite ends, and minimal decor that won’t injure delicate gills.
Axolotl Tank Filter Guide
Filtration is where many new owners make mistakes that cost their pet’s health. Axolotls produce enormous amounts of waste — more than most fish of similar size — but they absolutely cannot tolerate strong water currents. Getting your axolotl tank filter setup right requires balancing biological capacity with gentle flow.
Why axolotls need special consideration: In their natural habitat — the canals and lakes of Xochimilco, Mexico — the water is still or very slow-moving. Axolotls didn’t evolve to fight currents. Strong water flow stresses them, causes them to hide more and eat less, and over time leads to loss of their external gills, which they rely on for respiration.
Filter type comparison:
| Filter Type | Flow | Bio-Filtration | Cost | Verdict for Axolotls |
|---|---|---|---|---|
| Sponge filter | Very gentle | Excellent | $15-25 | ✅ Best for most setups |
| Canister filter | Strong (needs baffling) | Excellent | $80-150 | ⚠️ Good for 40+ gal only |
| HOB filter | Moderate (needs baffling) | Good | $25-50 | ⚠️ Works with baffle |
| Undergravel filter | None | Poor | $10-15 | ❌ Anaerobic gas risk |
| No filter | None | None | $0 | ❌ Never do this |
Sponge filter (recommended): For 90% of axolotl keepers, a sponge filter axolotl tank is the right call. A sponge filter uses an air pump to draw water through porous sponges that house beneficial bacteria. The flow is extremely gentle — just a column of small bubbles. They provide excellent biological filtration, are cheap to buy and run, and are nearly silent. The main drawback is aesthetics — a large sponge sitting in the corner isn’t the most attractive look. When choosing the best axolotl tank filter, a sponge filter checks almost every box.
Canister filter: For larger tanks (40+ gallons), a canister filter axolotl tank setup handles heavy bioloads efficiently. However, the output flow is almost always too strong for axolotls without modification. You’ll need to baffle the output — usually by placing a sponge over the outflow or directing it against the glass. This adds complexity and maintenance. If you already own one or plan to keep multiple axolotls, a canister filter with baffling is a solid option.
HOB filter: Hang-on-back filters offer moderate flow and decent filtration at a reasonable price, but most models create too much surface agitation and current for axolotl comfort. Like canister filters, they can work with a baffle, but a sponge filter is simpler and cheaper for most setups.
Undergravel filter: Not recommended. These pull waste into the substrate where it decomposes anaerobically, creating toxic gas pockets. They’re also extremely difficult to clean in an axolotl tank setup with sand substrate.
The hygger Double Sponge Filter is the filter I recommend for a standard axolotl tank setup. At $19.99 with over 2, it’s the most popular sponge filter for axolotl tanks on Amazon. The double sponge design provides excellent biological filtration capacity for a 20-gallon tank, and the flow is gentle enough that it won’t stress your axolotl. It comes with spare sponges, and you’ll need to pair it with a separate air pump (roughly $10-15), which isn’t included. A few owners have reported weak flow in larger tanks — if you’re using a 29-gallon or bigger, consider running two sponge filters instead of one.
hygger Double Sponge Filter on Amazon
Filter setup tips: Position the filter opposite the main hideout — this keeps the area where your axolotl rests as calm as possible. When cleaning the sponge, never replace both sponges at once — swap one, wait two weeks, then swap the other. This preserves the beneficial bacteria colony that keeps your water safe. If the bubbles seem too vigorous, add a control valve to the airline tubing to reduce airflow.
Axolotl Tank Substrate
Substrate choice in your axolotl tank setup isn’t just about aesthetics — it’s a safety issue. Get this wrong and your axolotl could face fatal impaction. Choosing the best axolotl tank substrate is one of the most important decisions you’ll make.
| Substrate | Safe for Axolotls? | Pros | Cons |
|---|---|---|---|
| Fine sand | ✅ Yes | Natural look, safe if swallowed | Can cloud water initially |
| Bare bottom | ✅ Yes | Easy cleaning, no impaction risk | Unnatural, can cause stress |
| Large river stones | ⚠️ Risky | Attractive look | Food and waste get trapped |
| Gravel / pebbles | ❌ No | Cheap, widely available | Fatal impaction risk |
| Colored gravel | ❌ No | Colorful | Sharp edges, dye leaching |
Rule number one: never use gravel. This isn’t a preference — it’s a safety requirement. Axolotls feed by creating a vacuum with their mouths, sucking in food and anything else near it from the bottom. If there’s gravel on the axolotl tank substrate, they will inevitably swallow stones. Those stones can cause intestinal blockages that require surgery to remove, and in many cases the result is fatal.
Fine sand is the gold standard. When axolotls swallow sand particles, the grains are small enough to pass safely through their digestive system. Sand also provides a natural surface that supports beneficial bacteria growth. Rinse the sand thoroughly before adding it — most sand arrives dusty and will cloud the water for days if you don’t rinse it first. Run the sand through water in a bucket, stirring and draining, until the water runs completely clear.
Aqua Natural Sugar White Sand is a solid choice for your axolotl tank setup. At $12.99 for a 5-pound bag with it’s affordable and well-regarded. The bio-substrate formula supports beneficial bacteria, and the fine grain size is safe if ingested. A 5-pound bag covers a 20-gallon tank at roughly 1-inch depth. Two things to note: the color tends to be more beige than pure white (despite the name), and some bags arrive with a strong smell that requires thorough rinsing.
Aqua Natural Sugar White Sand on Amazon
Sand depth: 1-2 inches is ideal. Thicker sand beds can develop anaerobic zones where harmful bacteria produce hydrogen sulfide gas.
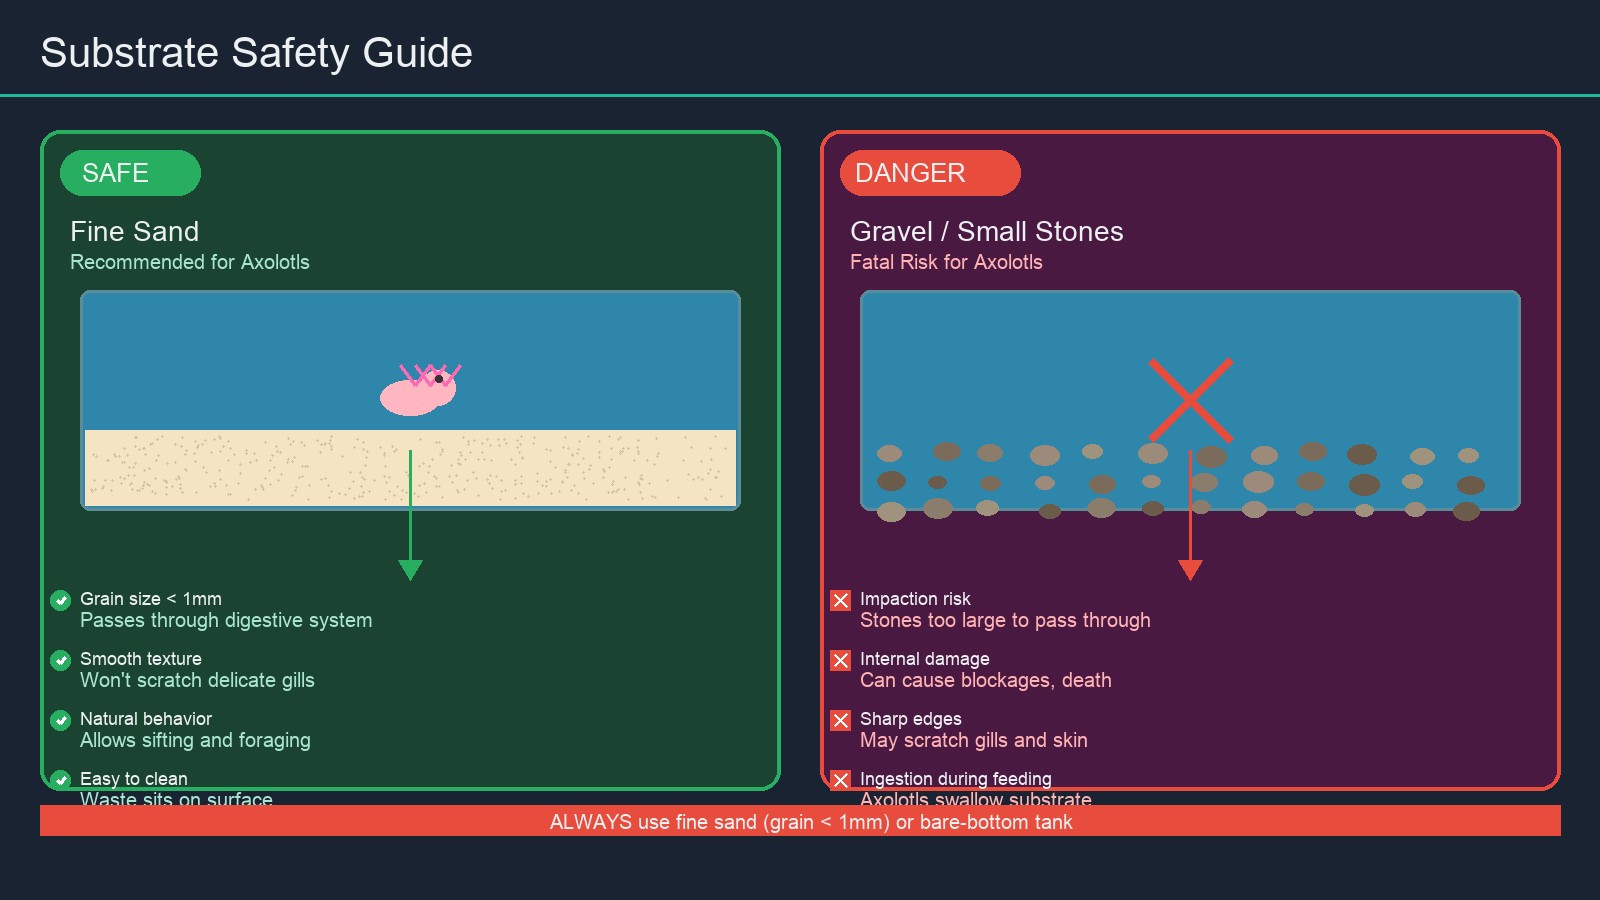
The comparison above illustrates why fine sand (left) is the only safe choice — axolotls vacuum-feed from the bottom and will swallow gravel, causing potentially fatal intestinal impaction.
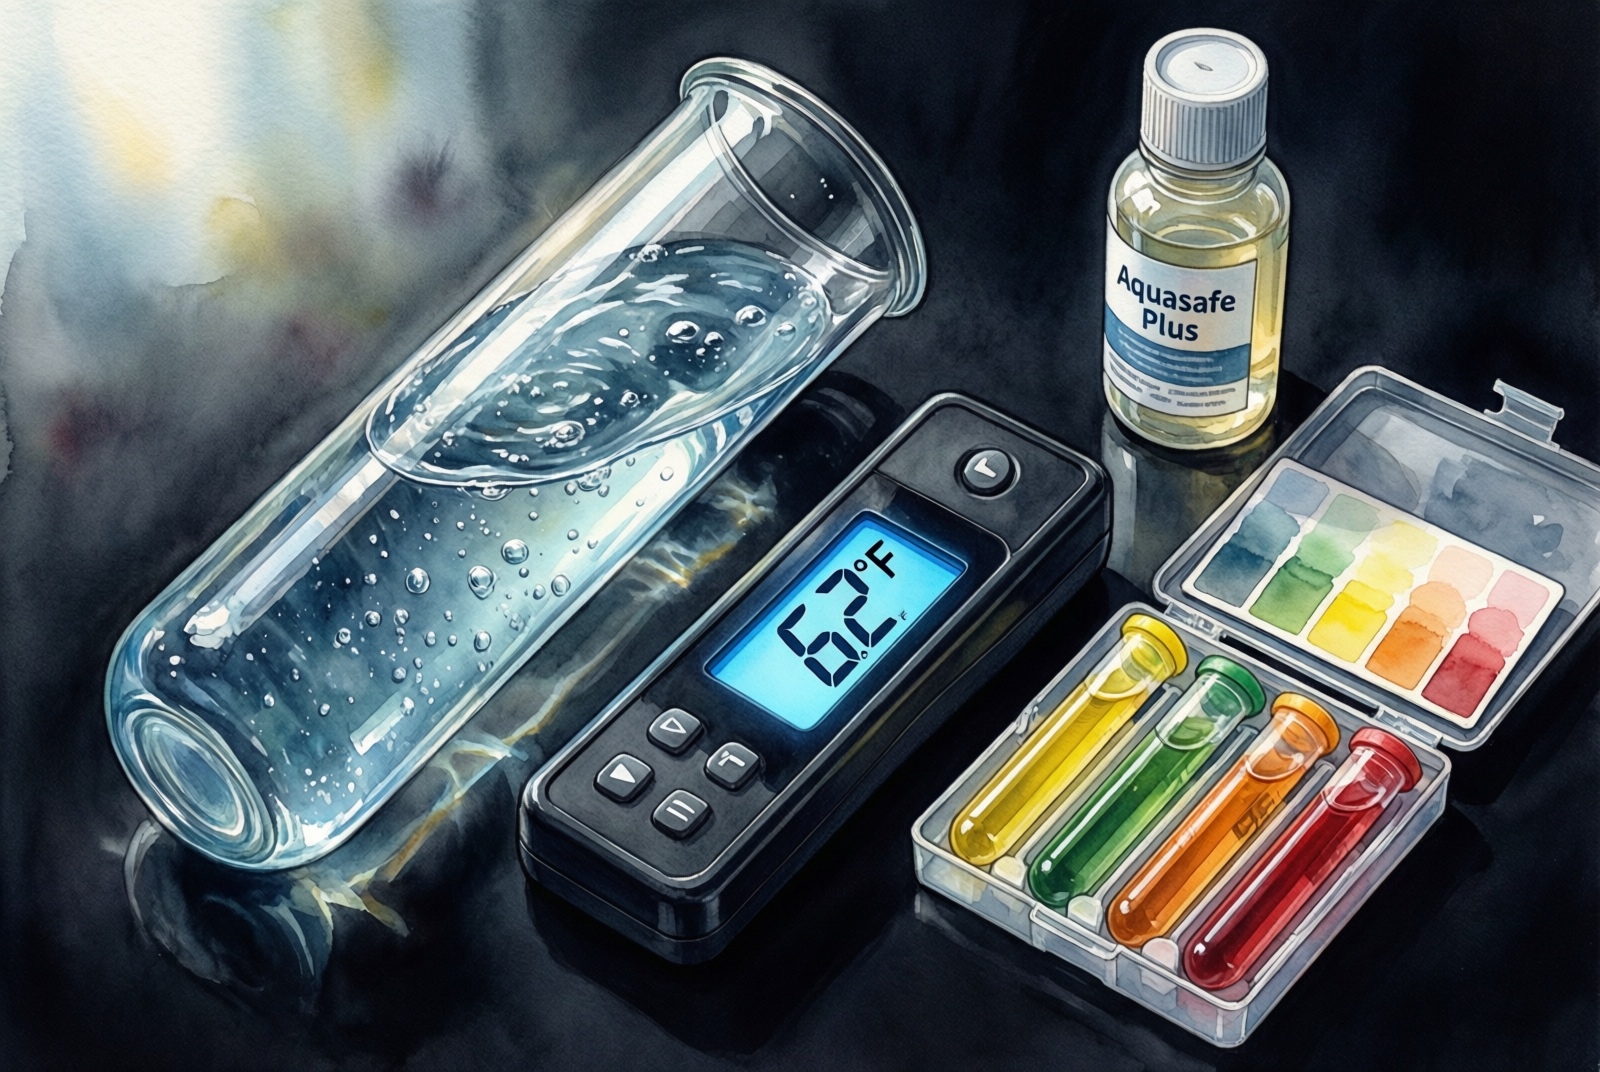
Axolotl Water Parameters
Water quality is the single most important factor in any aquarium. Understanding axolotl water parameters and how to maintain them will prevent most common health problems in your axolotl tank setup.
| Parameter | Ideal Range | Acceptable Range | How Often to Test |
|---|---|---|---|
| Temperature | 60-64°F (16-18°C) | 57-68°F (14-20°C) | Daily |
| pH | 7.4-7.6 | 6.5-8.0 | Weekly |
| Ammonia (NH3) | 0 ppm | 0 ppm | Weekly (daily during cycling) |
| Nitrite (NO2) | 0 ppm | 0 ppm | Weekly (daily during cycling) |
| Nitrate (NO3) | Under 20 ppm | Under 40 ppm | Weekly |
| GH (General Hardness) | 7-14 dGH | 3-15 dGH | Monthly |
| KH (Carbonate Hardness) | 3-8 dKH | 2-12 dKH | Monthly |
The ideal axolotl tank temperature range is 60-64°F. Most homes are too warm — if your room exceeds 72°F, you’ll need active cooling. For a complete guide to temperature management including chiller recommendations and seasonal strategies, see our axolotl tank temperature guide.
Water conditioning: Tap water must be treated before it goes into the tank — municipal water treatment chemicals kill beneficial bacteria and irritate axolotl skin and gills. Every time you add tap water (initial fill, water changes, top-offs), treat it with a water conditioner first.
Seachem Prime is the water conditioner I recommend for any axolotl tank setup. At $15.49 for the 500ml bottle with over 41, it’s the best-selling water conditioner on Amazon. It removes chlorine and chloramine and temporarily detoxifies ammonia, nitrite, and nitrate during cycling — buying time for beneficial bacteria to establish. The 500ml bottle treats up to 5,000 gallons, lasting most single-tank owners well over a year. Dosage: 2 drops per gallon.
Seachem Prime Water Conditioner on Amazon
Water testing: The API Freshwater Master Test Kit gives accurate readings for pH, ammonia, nitrite, and nitrate. Liquid test kits are far more reliable than test strips. During the cycling phase, test ammonia, nitrite, and nitrate daily. Once the tank is established and your axolotl is living in it, weekly testing is sufficient.
API Freshwater Master Test Kit on Amazon
Water change schedule: Once your axolotl tank setup is cycled and your axolotl is living in it, change 25% of the water weekly. Use a gravel vacuum to remove waste from the substrate, and always treat new water with Seachem Prime before adding it. Consistent water changes are the single most important maintenance task for any axolotl tank setup.
Cycling Your Axolotl Tank
This is the most important section of this axolotl tank cycling guide. Establishing colonies of beneficial bacteria that process toxic waste into relatively harmless compounds is not optional — it’s the difference between a healthy axolotl and a dead one. Every successful axolotl tank setup starts here. Skipping the nitrogen cycle is like building a house with no plumbing. The waste has nowhere to go, toxins accumulate, and the result is fatal.
How the Nitrogen Cycle Works
When your axolotl produces waste, that waste breaks down into ammonia — a highly toxic compound that burns gills and damages internal organs at even low concentrations. In a cycled tank, two types of beneficial bacteria live in your filter and substrate:
- Nitrosomonas bacteria convert ammonia into nitrite (also toxic, but less so)
- Nitrobacter/Nitrospira bacteria convert nitrite into nitrate (relatively harmless at low levels)
This process — ammonia → nitrite → nitrate — is the nitrogen cycle. A “cycled” tank is one where these bacteria are established in sufficient numbers to process all the waste your axolotl produces, keeping ammonia and nitrite at zero.
Method 1: Fishless Cycling (Recommended)
This is the standard method for every new axolotl tank setup. It requires patience but no live animals.
- Set up the complete tank — substrate, filter (running), decor, and treated water
- Add a source of ammonia: pure household ammonia (no surfactants, no scents) at 2-4 ppm, or a pinch of fish food daily
- Test water daily for ammonia, nitrite, and nitrate
- After 1-2 weeks, ammonia will rise, then begin dropping as nitrite appears
- After 2-4 weeks, nitrite will peak and begin dropping as nitrate appears
- The cycle is complete when: ammonia = 0 ppm, nitrite = 0 ppm, nitrate is measurable
- Do a large water change (50-70%) to lower nitrate below 20 ppm
Timeline: 3-6 weeks. During cycling, use Seachem Prime (2 drops per gallon) to temporarily detoxify any ammonia or nitrite spikes. This doesn’t replace the need for beneficial bacteria — it just buys time while the colony establishes.
Method 2: Seeded Cycling (Fastest)
If you have access to an established, healthy aquarium, you can borrow beneficial bacteria directly.
- Take filter media (a sponge or bio-ring), a handful of substrate, or a decoration from the established tank
- Place it directly into your new tank — don’t rinse it
- Add your ammonia source and test daily
- The cycle typically completes in 1-2 weeks instead of 3-6
The key is that the source tank is healthy — no recent disease outbreaks, no medications in use, and stable water parameters. Transferring bacteria from a sick tank transfers pathogens too. For more on how cycling connects to ongoing care, see our axolotl care guide.
Method 3: Bacterial Starter Products
Products like API Quick Start or FritzZyme 7 contain concentrated live bacteria designed to jumpstart the cycle. Bacterial starters are less reliable than other methods — some bottles work well, others seem to have no effect, likely due to storage conditions and shipping killing the bacteria. If you use one, still monitor water parameters and be prepared to wait the full 3-6 weeks if the bacteria don’t take hold.
Confirming the Cycle Is Complete
The definitive test for your axolotl tank setup: ammonia 0, nitrite 0, nitrate present. If ammonia or nitrite are still detectable, the cycle isn’t done. During the cycling period, you may see ammonia spike to 4+ ppm and nitrite follow — this is normal and expected. The bacteria colonies are growing to handle that load.
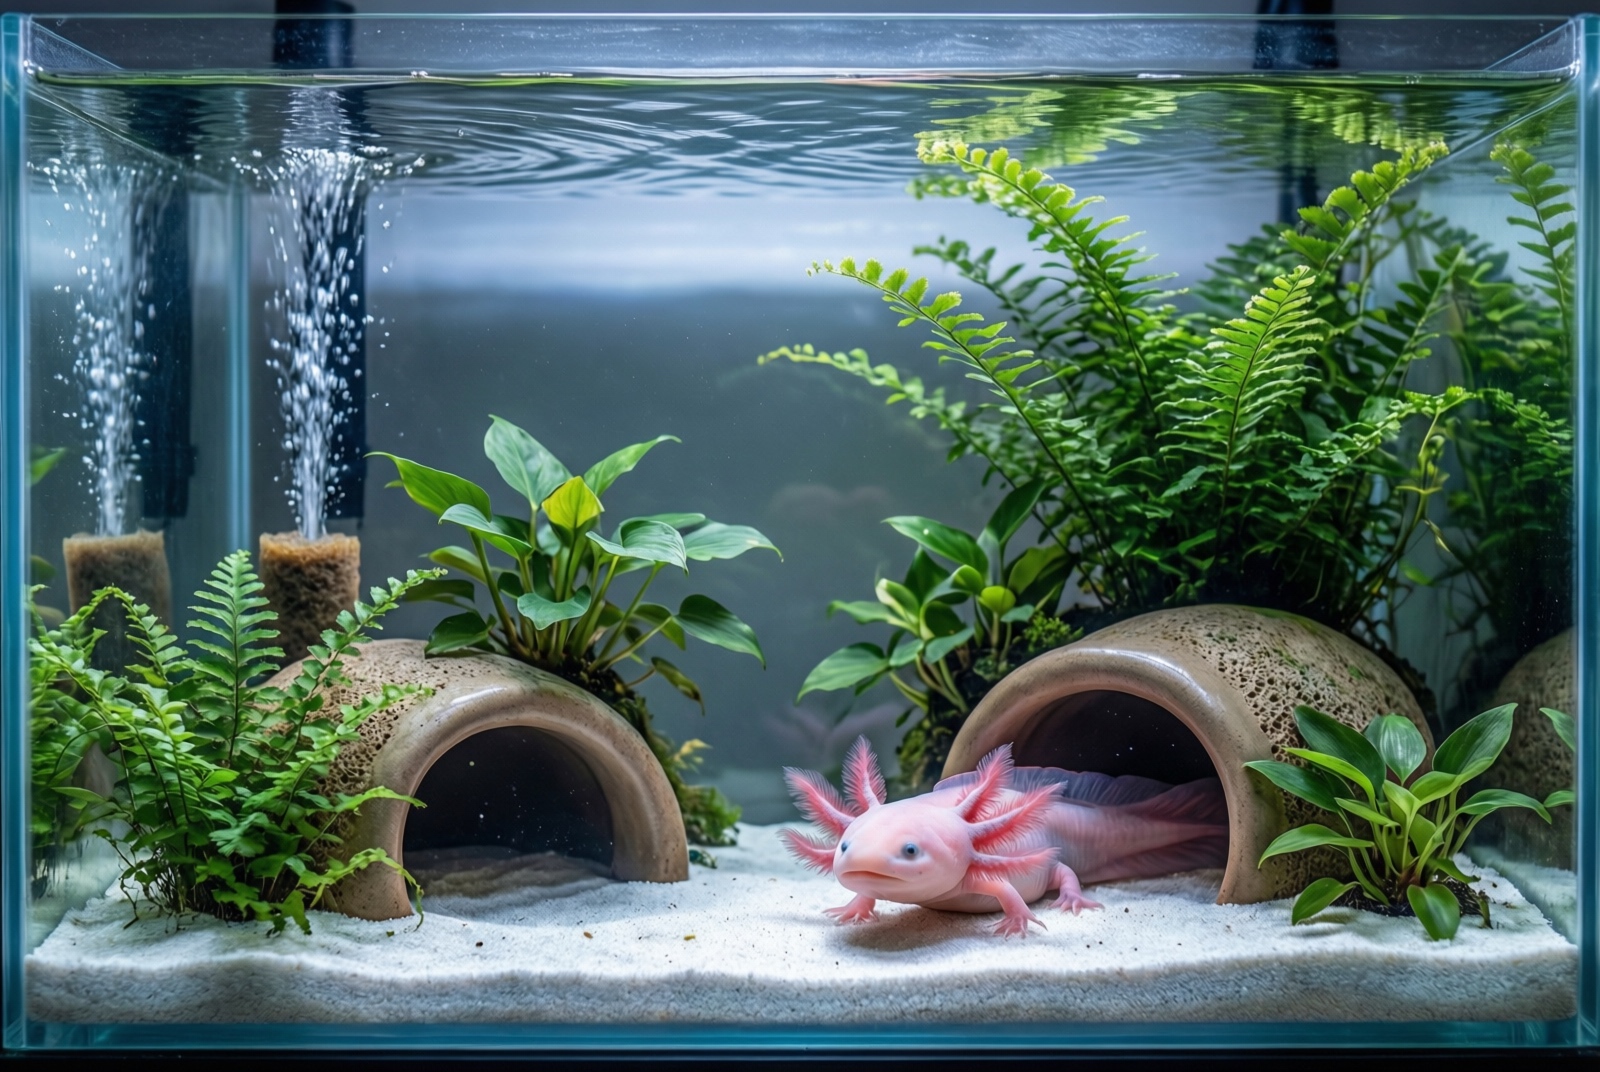
Axolotl Tank Decor
Axolotls are ambush predators in the wild — they wait in cover and strike at passing prey. This instinct means they need hiding spots to feel secure. Without cover, your axolotl will be constantly stressed, which suppresses appetite, weakens the immune system, and makes them more susceptible to disease. Here are some basic axolotl tank setup ideas for decor that work.
Minimum requirements: Every axolotl tank setup needs at least two hides on opposite ends. This gives your axolotl options and prevents a single hide from becoming contested territory.
Safe decor options: Ceramic caves, PVC pipes, boiled driftwood (boil for 30+ minutes to kill pathogens), silk plants (no sharp edges), and live plants like java fern, anubias, and marimo moss balls. These live plants also help maintain water quality by absorbing nitrates.
Unsafe: Anything with sharp edges, rough surfaces, chipping paint, or chemical coatings. Axolotls have delicate skin and feathery external gills that tear easily on abrasive surfaces. The finger test rule: if it catches your finger, don’t put it in the tank.
For our full guide with tested product recommendations and setup ideas, see our axolotl tank decor guide.
Step-by-Step Axolotl Tank Setup
This section brings everything together into a complete walkthrough. Here’s how to set up axolotl tank for beginners — follow these steps for a safe, properly cycled axolotl tank setup for beginners ready for its new inhabitant.
Step 1: Choose and Position Your Tank (Day 1) — Select a 20-gallon long or larger tank. Place it on a sturdy, level surface that can support the weight — a 20-gallon tank with water, substrate, and decor weighs approximately 200 pounds. Position the tank away from direct sunlight, windows (causes temperature fluctuations and algae), heat sources (radiators, vents), and high-traffic areas. Make sure a power outlet is within reach for the filter and air pump.
Step 2: Rinse and Add Substrate (Day 1) — Rinse your sand thoroughly. Put the sand in a bucket, fill with water, stir vigorously, pour off the cloudy water, and repeat until the water runs completely clear. This can take 10-15 rounds for dusty sand. Once rinsed, add 1-2 inches of sand to the tank bottom, sloping slightly higher in the back for visual depth.
Step 3: Install the Filter (Day 1) — Set up your sponge filter in a back corner, opposite to where you plan to place the main hideout. Connect the airline tubing to the filter and run it to your air pump, which should sit below the tank water level (to prevent back-siphoning if the pump stops). Turn on the air pump and adjust the flow so you see a gentle stream of small bubbles.
Step 4: Add Decor and Hiding Spots (Day 1) — Place at least two hides on opposite ends of the tank. Arrange driftwood, silk plants, or live plants around them, leaving an open swimming corridor in the center. Avoid stacking decor so high that your axolotl could get stuck behind or under it.
Step 5: Fill and Treat the Water (Day 1) — Fill the tank slowly — pour onto a plate or plastic bag placed on the substrate to prevent sand from being disturbed. Treat the water with Seachem Prime (2 drops per gallon) as you fill. Install your thermometer and verify the water temperature reads between 60-64°F. If it’s above 68°F, you’ll need a cooling solution before adding your axolotl.
Step 6: Start the Nitrogen Cycle (Weeks 1-6) — Follow the fishless cycling method described above. Add your ammonia source, test daily, and wait for ammonia and nitrite to both reach 0 ppm with measurable nitrate. Use Seachem Prime during this period to detoxify ammonia spikes. This is the waiting game — resist the temptation to add your axolotl early.
Step 7: Introduce Your Axolotl (Day 43+) — Once the cycle is complete, do a 50-70% water change to bring nitrate below 20 ppm. When bringing your axolotl home, acclimate slowly:
- Float the transport bag in the tank for 15 minutes (temperature equalization)
- Open the bag and add a small amount of tank water every 5 minutes for 30 minutes
- Gently net the axolotl from the bag into the tank — don’t pour bag water in (it may contain pathogens)
- Keep tank lights off or very dim for the first 24-48 hours to reduce stress
- Don’t feed for the first 12-24 hours — let your axolotl settle in
- Monitor closely for the first week: check gill movement (should be gentle, rhythmic), activity level, and appetite
Axolotl Tank Setup Budget Breakdown
Here’s an honest breakdown of what an axolotl tank setup costs at three different budget levels. These are realistic estimates based on current Amazon prices — not including the axolotl itself. The axolotl tank setup cost varies significantly depending on your choices, but even a budget axolotl tank setup provides everything your pet needs to thrive.
| Item | Budget | Standard | Premium |
|---|---|---|---|
| Tank (20-29gal) | $40-60 | $70-120 | $150-200 |
| Filter | $15-20 | $20-35 | $80-150 |
| Substrate | $10-15 | $15-25 | $25-40 |
| Hides (×2) | $8-15 | $15-30 | $30-50 |
| Water conditioner | $12 | $15 | $15 |
| Test kit | $15 | $26 | $26 |
| Air pump | $10 | $15 | $15 |
| Thermometer | $5 | $10 | $15 |
| Gravel vacuum | $8 | $15 | $15 |
| Cooling (fan/chiller) | $15 | $25 | $80-120 |
| TOTAL | $138-170 | $246-316 | $436-646 |
Starter kit consideration: An axolotl tank setup kit like the Aqueon Aquarium Starter Kit at $189.99 includes the tank, filter, and LED — but you’ll still need to buy substrate ($13), a water conditioner ($15), hides ($10-15), and an air pump if you switch to a sponge filter ($10). So the total with the kit ends up around $240-260, which puts it squarely in the standard range. The tradeoff is convenience versus getting better individual components.
Monthly ongoing costs: $15-30 for food and occasional water treatment supplies. Axolotls themselves typically cost $25-60 from breeders, depending on color morph.
Common Axolotl Tank Setup Mistakes
These are the axolotl tank common mistakes I see most often — and most of them are preventable with basic research. Learning from others’ errors is one of the best ways to ensure your axolotl tank setup succeeds from day one.
Mistake 1: Using gravel or pebbles as substrate. This is the most dangerous mistake. Axolotls vacuum-feed from the bottom and will swallow gravel. The result is intestinal impaction — blockages that cause extreme pain, require surgery, and are frequently fatal. Fine sand or bare bottom are the only safe options.
Mistake 2: Skipping the nitrogen cycle. The number one killer of new axolotls in any axolotl tank setup. Without established beneficial bacteria, ammonia from waste builds to lethal levels within days. An uncycled tank will poison your axolotl. Always cycle for 3-6 weeks before adding your pet.
Mistake 3: Tank too small. A 10-gallon tank is temporary housing for juveniles only. Once your axolotl reaches 6 inches (usually within a few months), it needs at least 20 gallons. An undersized axolotl tank setup leads to poor water quality, stress, and stunted growth.
Mistake 4: Water too warm. Above 68°F, axolotls experience metabolic stress. Appetite decreases, activity drops, and susceptibility to bacterial and fungal infections increases dramatically. Above 75°F is dangerous. Above 80°F can be fatal. If your home exceeds 72°F, invest in a fan or chiller.
Mistake 5: Strong filter current. Powerful filters designed for tropical fish create currents that stress axolotls. They’ll spend all their time hiding, stop eating, and their external gills will deteriorate. A gentle sponge filter is almost always the better choice.
Mistake 6: No hiding spots. Without at least two hides on opposite ends of the tank, your axolotl is exposed 100% of the time. This chronic stress suppresses the immune system and leads to illness. Hides are non-negotiable.
Mistake 7: Adding the axolotl before the cycle completes. Even if you’re impatient, even if the water looks clear — if ammonia or nitrite are still detectable, the cycle isn’t done. Adding your axolotl to an uncycled tank means ammonia poisoning, which damages gills and internal organs. The early symptoms are subtle — slightly curled gill tips, reduced appetite — but the internal damage is real and often irreversible.
Mistake 8: Using a heater. Axolotls are cold-water amphibians from the high-altitude lakes around Mexico City. They never need supplemental heat. A heater will push the water temperature into the danger zone and cause exactly the problems you’re trying to prevent. This is one of the most counterintuitive aspects of axolotl tank setup — unlike tropical fish, axolotls need cool water, not warm.
Axolotl Tank Mates
The short answer: keep axolotls alone. When it comes to axolotl tank mates, the risks almost always outweigh the benefits. For the simplest and safest axolotl tank setup, a single axolotl in a properly sized tank is the way to go.
Axolotls are ambush predators. In the wild, they sit in cover and eat anything that fits in their mouth. In a tank, this instinct doesn’t change — anything small enough to swallow is food, and anything large enough to leave the gills alone might be perceived as a threat.
| Potential Tank Mate | Risk Level | Why |
|---|---|---|
| Small fish (neon tetras, etc.) | ❌ High | Nip at external gills |
| Large fish (cichlids, goldfish) | ❌ High | May attack axolotl or carry diseases |
| Snails (nerite, mystery) | ⚠️ Low | Generally safe but may be eaten |
| Shrimp (ghost, cherry) | ⚠️ Medium | May become food, especially for larger axolotls |
| Other axolotls | ⚠️ Medium | 40+ gal required, cannibalism risk with juveniles |
Two axolotls together can work in very specific circumstances: a 40+ gallon tank, both animals are similar in size (within an inch of each other), and preferably raised together from juveniles. Even then, I’d only recommend this for experienced keepers who have a backup tank ready for immediate separation if aggression occurs. Juvenile axolotls have a well-documented tendency toward cannibalism — toes, tail tips, and gill filaments are common targets.
Frequently Asked Questions
What size tank does an axolotl need?
A single adult axolotl needs a minimum 20-gallon long tank (30”×12”×12”). A 29-gallon tank is recommended for adults over 10 inches. Juveniles can start in a 10-gallon tank temporarily but must upgrade by 6 inches. For two axolotls, a 40+ gallon tank is required. Long (breeder) tanks are always preferred over tall tanks since axolotls are bottom-dwellers.
What temperature should an axolotl tank be?
60-64°F is ideal. Axolotls are cold-water amphibians from the high-altitude lakes around Mexico City, and they evolved for cool water. Above 68°F causes stress and reduced appetite. Above 75°F is dangerous — bacterial and fungal infections become much more likely. If your home stays above 72°F, use a fan across the water surface or invest in an aquarium chiller. Never use a heater.
Do axolotls need a filter?
Absolutely yes. Axolotls produce more waste than most similarly-sized aquatic animals, and without a filter, ammonia reaches lethal levels within days. A sponge filter is the best choice — the gentle flow won’t stress your axolotl, and the biological filtration capacity is excellent. Avoid power filters and canister filters unless you baffle the output to reduce flow.
What substrate is safe for axolotls?
Fine sand is the only substrate I’d recommend for an axolotl tank setup. Axolotls feed by vacuuming food from the bottom, and any small, swallowable objects — gravel, pebbles, colored stones — will be ingested and can cause fatal intestinal impaction. Bare bottom tanks are also safe but less natural-looking and can contribute to stress. Never use gravel.
How long does it take to cycle an axolotl tank?
Fishless cycling takes 3-6 weeks. Seeded cycling (borrowing established bacteria from another tank) takes 1-2 weeks. Bacterial starter products can potentially speed things up but are less reliable. The cycle is confirmed complete when ammonia reads 0 ppm, nitrite reads 0 ppm, and nitrate is measurable but below 40 ppm. Use Seachem Prime during cycling to temporarily detoxify ammonia and nitrite. Never add an axolotl to an uncycled tank.
Can axolotls live with tank mates?
For the safest setup, keep axolotls alone. Fish small enough to avoid being eaten may nip at the axolotl’s delicate external gills. Fish large enough to leave the gills alone may be eaten by the axolotl. Two axolotls together requires a 40+ gallon tank and carries risks of territorial aggression and cannibalism, especially with juveniles. The healthiest setup is one axolotl in its own properly sized tank.
How much does an axolotl tank setup cost?
A complete setup costs $120-350 depending on tank size and component choices. Budget builds start around $140 for a basic 20-gallon setup with a sponge filter and sand substrate. Standard setups run $250-320. Premium setups with a chiller and canister filter can reach $450-650. Monthly ongoing costs are $15-30 for food and water treatment.
Can you use a 20-gallon tank for an axolotl?
Yes, a 20-gallon long (breeder) tank is the minimum for one adult axolotl. Long tanks are better than tall tanks since axolotls are bottom-dwellers who need horizontal swimming space, not vertical height. A 20-gallon long (30”×12”×12”) is the sweet spot for beginners — affordable, manageable, and spacious enough for a single adult under 10 inches.
What is the best filter for an axolotl tank?
Sponge filters are the best axolotl tank filter for most setups — gentle flow, excellent biological filtration, and low cost ($15-25). The hygger Double Sponge Filter ($19.99) works well for 20-gallon tanks. Canister filters work for larger tanks (40+ gallons) but need flow baffling to prevent stressing your axolotl.
Can you skip cycling an axolotl tank?
No. Without the nitrogen cycle, ammonia from waste builds to lethal levels within days. Skipping cycling is the number one cause of death in new axolotls. The process takes 3-6 weeks with the fishless method or 1-2 weeks with seeded media from an established tank. There is no shortcut that’s reliable enough to risk your pet’s life.
What are the most common axolotl tank setup mistakes?
Using gravel instead of sand (fatal impaction risk), skipping the nitrogen cycle (ammonia poisoning), tanks that are too small (stress and poor water quality), water too warm (immune suppression), strong filter current (stress and gill damage), no hiding spots (chronic stress), adding the axolotl before cycling completes, and using a heater. These are the axolotl tank common mistakes that account for the vast majority of health problems in new axolotls.
Do axolotls need a heater or chiller?
Never a heater. Axolotls are cold-water animals that need water between 60-64°F. Most homes are too warm for them — if your room regularly exceeds 72°F, you need active cooling. A desk fan blowing across the water surface drops temperature by 2-4°F through evaporation. For reliable, consistent cooling, an aquarium chiller ($80-150) is the best long-term investment.
Conclusion
Getting your axolotl tank setup right from the start is one of the most important things you can do for your pet. A proper axolotl tank setup isn’t complicated, but it requires attention to detail and patience — especially during the cycling phase. The key points: choose a 20-gallon long tank or larger, use fine sand instead of gravel, run a gentle sponge filter, cycle the tank completely before adding your axolotl, and keep the water cool.
Now that your tank is set up, learn what to feed your axolotl in our best axolotl food guide. For ongoing care — health checks, handling, and behavior — see our axolotl care guide.
This guide represents current best practices based on veterinary guidance, research, and experienced keeper recommendations. Axolotl care is an evolving field — when in doubt, consult a qualified exotic veterinarian.