A DIY bin cage is a DIY enclosure made from a clear plastic storage bin — and it’s one of the smartest decisions a budget-conscious hamster owner can make. For $15-60 in materials, you can create a cage that meets or exceeds the minimum floor space requirements that most commercial cages fail to provide.
This complete guide covers everything you need: choosing the right bin, size requirements by breed, a step-by-step DIY tutorial with supply lists, setup tips, and safety guidelines. Whether you’re building your first bin cage or upgrading to a larger one, this guide has you covered. For a broader overview of all cage types, see our hamster cage setup guide, and for detailed enclosure requirements see our proper hamster enclosure guide.
What Is a Hamster Bin Cage?
A clear plastic storage container modified with a mesh ventilation lid serves as an excellent hamster enclosure. The concept is simple but effective: you’re converting a cheap storage bin into a spacious, safe, and transparent hamster home.
Why Bin Cages Are Popular
- Affordable — A complete DIY bin cage costs $40-80, compared to $100-200+ for a commercial cage that often provides less space
- Spacious — Large storage bins easily meet or exceed minimum floor space requirements (100cm x 50cm for Syrian hamsters)
- Transparent — Clear polycarbonate walls let you watch your hamster without disturbance
- Deep — Tall bin walls contain deep bedding and prevent substrate from scattering
- Customizable — You choose the size, accessories, and layout
Who Should (and Shouldn’t) Use a Bin Cage
A bin cage is ideal for budget-limited owners, DIY enthusiasts, and anyone who needs a temporary or backup enclosure. It’s less suitable for owners who want a decorative display cage or prefer not to do any assembly work.

Bin Cage Size Requirements (Syrian vs Dwarf)
The most important factor in choosing a bin is floor space — specifically, continuous unbroken floor area. Hamsters are ground-dwelling animals that run horizontally, so width and length matter far more than height.
Minimum Floor Space
| Hamster Type | Minimum Floor Space | Minimum Dimensions |
|---|---|---|
| Syrian hamster | 776 sq in (5,000 cm²) | 100cm x 50cm (39” x 20”) |
| Dwarf hamster | 496 sq in (3,200 cm²) | 80cm x 40cm (31” x 16”) |
These minimums represent the absolute floor — not the ceiling. For more detail on Syrian hamster cage size requirements, see our Syrian hamster cage size guide.
Bin Depth Requirements
Your bin should be at least 12-15 inches deep internally. This provides enough vertical clearance for:
- 6-10 inches of bedding (hamsters need to burrow)
- A running wheel
- Your hamster standing upright without hitting the mesh lid
IRIS Storage Bin Size Comparison
IRIS USA makes the best bin for hamster cage projects. Their WeatherPro clear bins are durable, chew-resistant, and available in sizes that match hamster requirements: Their WeatherPro clear bins are durable, chew-resistant, and available in sizes that match hamster requirements:
| IRIS Model | Capacity | Approx. Dimensions | Floor Area | Suitable For |
|---|---|---|---|---|
| #6 32 Quart | 32 quart | 16”L x 10”W | ~160 sq in | ⚠️ Dwarf hamsters only |
| #2 116 Quart | 116 quart | 25”L x 17”W | ~425 sq in | Syrian (minimum) |
| IRIS USA 194 Quart | 194 quart | 33”L x 18”W | ~594 sq in | ✅ Syrian (recommended) |
Important: The 32 Quart bin is too small for Syrian hamsters. Even though it’s often marketed as a “hamster bin,” its 160 sq inch floor area is less than half the minimum requirement for a Syrian. Only use it for dwarf hamsters.
For a bin cage for Syrian hamsters, the 194 Quart is the best choice. At 594 sq inches, it exceeds the 450 sq inch minimum with room for all essential accessories.
Best Storage Bins for Hamster Cages (2026)
When selecting a bin, look for four things: clear walls (for visibility), durable construction (chew-resistant), adequate size (meeting minimum floor space), and a latching lid (security).
Best Bin for Syrian Hamsters
IRIS USA 194 Quart Clear Storage Container — $34.99 | ⭐4.4 This is the best bin for Syrian hamsters and our top recommendation. At 33” x 18”, the 594 sq inch floor area exceeds minimum requirements with generous room for a wheel, hideouts, and deep bedding. The clear polycarbonate construction is thick enough to resist chewing, and the airtight lid with secure latches provides safety once modified with a mesh screen. , it’s one of the most proven storage containers on Amazon.
IRIS USA 116 Quart Clear Storage Container — $58.49 | ⭐4.7 The 116 Quart is the minimum acceptable size for a Syrian hamster. At 25” x 17” (425 sq inches), it meets the absolute minimum but leaves less room for accessories compared to the 194 Quart. The stackable design is useful if you need multiple enclosures. Some owners report latch tabs breaking over time, so handle the lid carefully.
Best Bin for Dwarf Hamsters
IRIS USA 32 Quart Clear Storage Container — $26.99 | ⭐4.4 The compact 32 Quart bin works for dwarf hamsters at 16” x 10”. Its small footprint fits on desks and shelves, making it ideal for children’s rooms or small apartments. Do not use this for Syrian hamsters — the floor space is severely insufficient.
Pre-Made Bin Cages for Sale
If you don’t want to DIY, some Etsy sellers offer pre-modified bin cages with mesh lids already installed. These typically cost $50-100 and save you the cutting and assembly work. The trade-off is higher cost and limited customization options.
DIY Bin Cage Supplies Checklist
Before starting your DIY project, gather everything you’ll need. Having all materials ready before you begin makes the process much smoother.
Tools
| Tool | Purpose | Budget |
|---|---|---|
| Utility knife / box cutter | Cutting the lid for ventilation | $5-10 |
| Wire cutters / tin snips | Cutting hardware cloth to size | $5-15 |
| Sandpaper / metal file | Smoothing cut edges | $3-5 |
| Hot glue gun + glue sticks | Securing mesh to lid | $10-15 |
| Ruler + marker | Measuring and marking cut lines | $3-5 |
| Power drill (optional) | Drilling hole for water bottle mount | $0 if owned |
Materials
| Material | Purpose | Budget |
|---|---|---|
| IRIS storage bin | Main enclosure body | $27-59 |
| Hardware cloth / wire mesh | Ventilation lid | $10-20 |
| Zip ties or wire | Securing mesh to lid frame | $3-5 |
| Water bottle | Drinking water supply | $11-12 |
| Exercise wheel | Daily exercise | $37 |
| Bedding | Substrate and burrowing material | $20 |
Total estimated budget: $40-80 (DIY materials) + $70-80 (accessories) = $110-160 for a complete setup. This is significantly less than most commercial cages of equivalent size.
Hamster Bin Cage Setup: Step-by-Step
This DIY tutorial takes you through the complete build process. Expect 1-2 hours for your first build — subsequent builds go much faster.
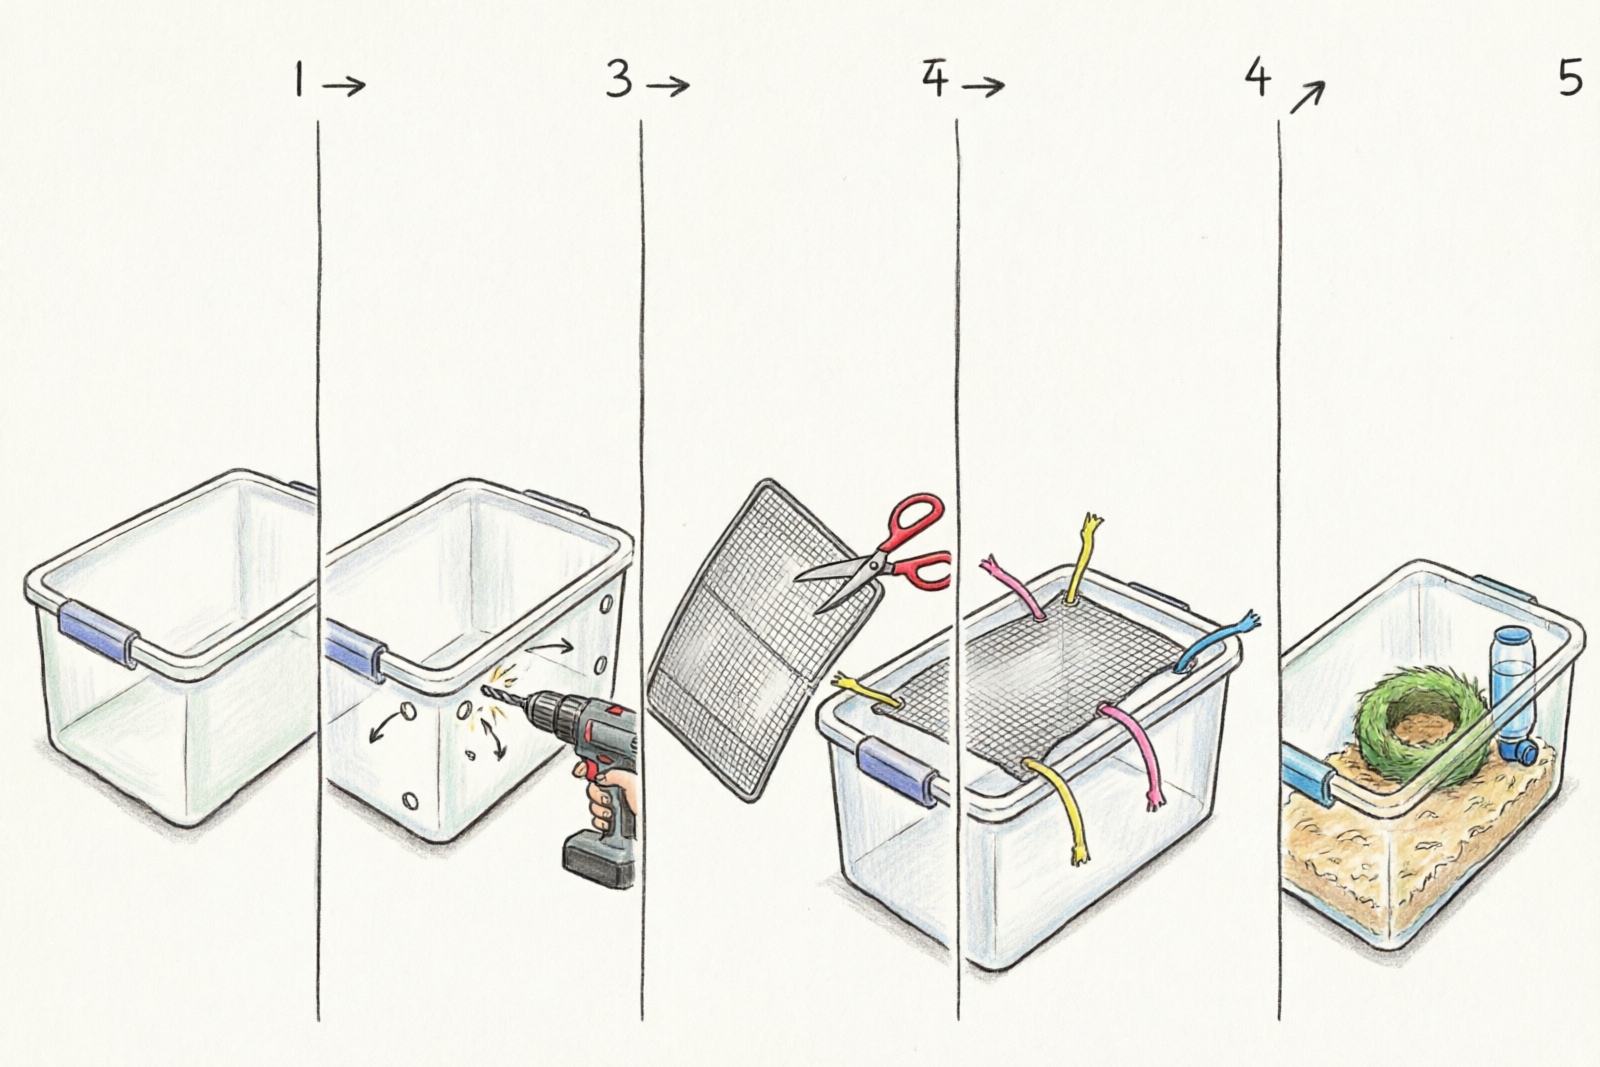
Step 1 — Choose & Prepare Your Bin
Select your bin based on your hamster’s breed (see the size comparison table above). Once you have your bin:
- Wash the bin inside and out with mild soap and water
- Remove all labels, stickers, and adhesive residue
- Inspect for sharp edges or manufacturing defects
- Dry completely before proceeding
Step 2 — Cut the Lid for Ventilation
This is the most important step. The original airtight lid cannot be used as-is — your hamster needs airflow to breathe.
- Measure the lid and mark a cutting area, leaving a 2-inch border around all edges
- Keep the border intact — this preserves the latch mechanism so the lid still locks securely
- Cut along your marked lines using a utility knife. Score the line first, then make multiple passes rather than trying to cut through in one stroke
- Sand all cut edges thoroughly with medium-grit sandpaper until smooth to the touch. Any rough edge can scratch or cut your hamster
- Save the cut-out center piece — it can serve as a backup lid or base for a second project
⚠️ Safety note: Work on a stable surface. Keep fingers away from the blade path. If you’re a minor, ask an adult to help with cutting.
Step 3 — Attach the Mesh Screen
Proper hamster bin cage ventilation through the mesh lid keeps your hamster safely contained while ensuring adequate airflow.
- Measure the opening you cut in Step 2
- Cut your hardware cloth or wire mesh 1 inch larger than the opening on all sides
- Place the mesh over the opening, folding the excess over the lid border
- Secure with hot glue along the edges and reinforce with zip ties every 3-4 inches
- Check for any sharp wire ends — bend them inward or cover with tape
- Press down firmly on the mesh to test it. If it flexes or lifts, add more zip ties
Step 4 — Install the Water Bottle
Mount the water bottle on the outside of the bin wall, near the top but within your hamster’s reach.
Recommended bottles:
Choco Nose No-Drip Small Animal Water Bottle — $11.99 | ⭐4.6 The Choco Nose uses a double-ball bearing design that virtually eliminates dripping. Its mounting hardware works well with bin cage walls, and multiple reviewers confirm it works on DIY cages where standard spring-mounted bottles fail. This is our top pick for bin cage setups.
Kaytee Clear View Water Bottle — $11.31 | ⭐4.6 A budget-friendly alternative with a clear bottle body and a floating duck indicator that makes it easy to check water levels from across the room. The spring-loaded sipper tube attaches securely to bin walls.
Installation steps:
- Mark the bottle position on the bin wall — high enough that the spout is 2-3 inches above the bedding line
- Drill or melt a small hole through the plastic (a heated nail works if you don’t have a drill)
- Insert the sipper tube through the hole from outside
- Secure the mounting bracket with the provided hardware or hot glue
- Fill with fresh water and test for leaks before adding your hamster
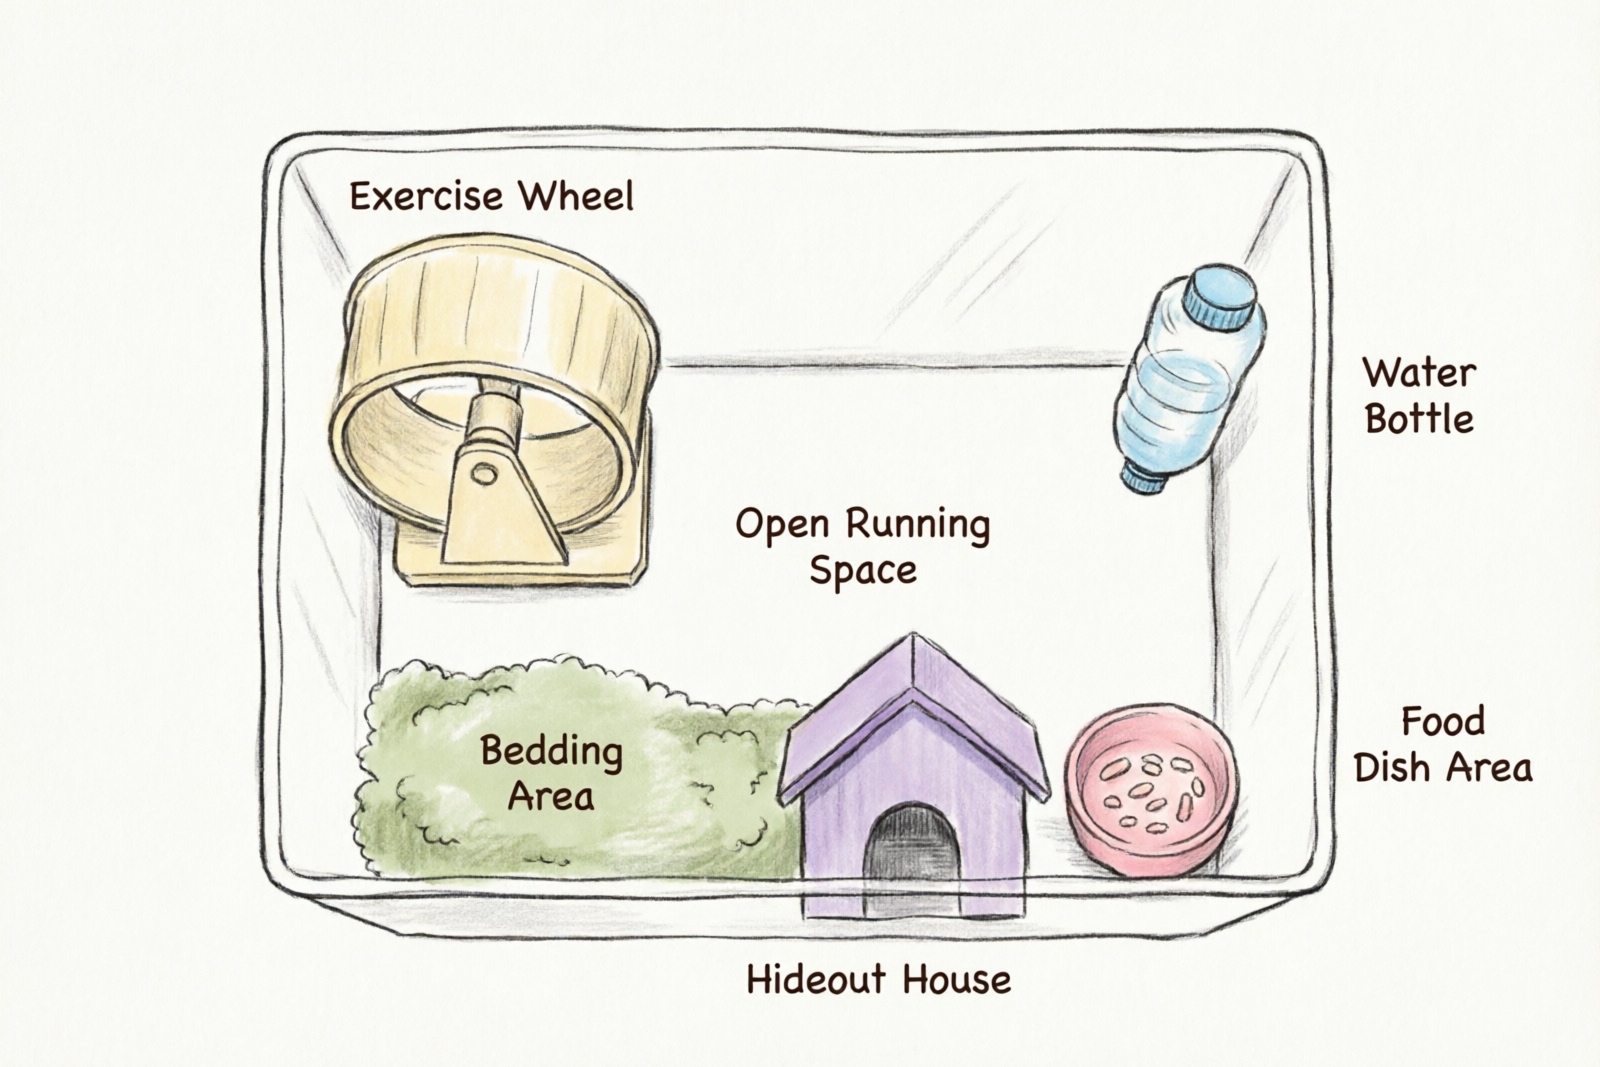
Step 5 — Add Bedding, Wheel & Accessories
Fill the bin and install essential accessories:
- Bedding: Add 6-10 inches of Kaytee Clean & Cozy Natural Paper Bedding ($19.95, ⭐4.5, 🔥) — 99.9% dust-free paper bedding that absorbs 6x its weight and controls odor effectively. The deep bin walls are a major advantage here, as they contain the bedding better than shallow commercial cages.
- Wheel: Place the Niteangel Super-Silent Hamster Exercise Wheel ($36.99, ⭐5.0, 🔥) in a corner. Choose 10.5-12” for Syrian hamsters or 8.5” for dwarfs. The dual-bearing design is genuinely quiet — essential for a bin cage in a bedroom. For more wheel options, see our hamster wheel size guide.
- Hideout: Place at least one enclosed shelter in the bin
- Food bowl: Position away from the water bottle and wheel
- Toys: Add tunnels, chew sticks, and foraging toys. See our hamster toys and enrichment guide for ideas.
Bin Cage Setup: Bedding, Wheel, Water & Enrichment
Bedding Depth & Layout
A bin cage’s deep walls give you a significant advantage for bedding depth. Aim for 6-10 inches of substrate — hamsters are natural burrowers, and deep bedding lets them express this instinct.
Layout tip: Create a gradient — deeper bedding on one side (the burrowing zone) and shallower bedding on the other (the activity zone where the wheel and food bowl go). This maximizes usable space while still providing a proper digging area.
Wheel Placement
Position the wheel in a corner with at least 2 inches of clearance on all sides. This prevents bedding from getting caught in the wheel mechanism. For Syrian hamsters, the minimum wheel diameter is 8.5 inches (21cm), though 10.5-12 inches is strongly recommended for comfort. For dwarfs, 8.5 inches is sufficient. A wheel that’s too small forces the hamster to arch its back while running, causing spinal damage over time.
Hideouts & Enrichment Ideas
Add at least one hideout where your hamster can sleep undisturbed. Beyond that, rotate enrichment items weekly to prevent boredom:
- Cardboard tube tunnels — Free and disposable; replace when soiled
- Cork hides — Natural look, safe to chew
- Sand bath — A small dish of chinchilla sand for grooming
- Scatter feeding — Hide food around the enclosure to encourage foraging
For more cage ideas and enrichment inspiration, see our cage enrichment guide and hamster diet guide.
Bin Cage Safety Tips & Common Mistakes
Safety Checklist
Before introducing your hamster, run through these checks:
| Check | Why It Matters |
|---|---|
| ✅ Mesh lid is firmly attached | Hamsters can push up loose mesh and escape |
| ✅ No sharp edges anywhere | Sand all cuts — plastic and wire edges cause injuries |
| ✅ Water bottle doesn’t leak | Wet bedding causes respiratory issues and skin infections |
| ✅ Ventilation covers 60%+ of lid | Insufficient airflow causes condensation and breathing problems |
| ✅ Bin depth is 12+ inches | Shallow bins don’t hold enough bedding for burrowing |
| ✅ Food-grade plastic only | IRIS WeatherPro bins are BPA-free and food-safe |
Common Mistakes to Avoid
- ❌ Bin too small — Using a 32 Quart bin for a Syrian hamster is cruel. The floor space is less than half the minimum requirement.
- ❌ No ventilation lid — Never use the original airtight lid. Your hamster will suffocate. This is non-negotiable.
- ❌ Unsanded edges — Even slightly rough plastic or wire can cut your hamster’s feet or mouth. Sand everything smooth.
- ❌ Bedding too shallow — Less than 3 inches of substrate prevents natural burrowing behavior and causes stress.
- ❌ Wheel too small — An 8-inch wheel for a Syrian hamster causes permanent spinal damage. Check our hamster wheel size guide for proper sizing.
Bin Cage vs Commercial Cage: Pros & Cons
| Feature | Bin Cage | Commercial Cage |
|---|---|---|
| Price | $40-80 DIY | $60-200+ |
| Floor space | Easily meets minimum | Many models fall short |
| Visibility | High (clear walls) | Varies by model |
| Aesthetics | Functional, not decorative | Wide variety of designs |
| Ventilation | DIY mesh lid (variable quality) | Usually built-in |
| Chew resistance | High (thick plastic) | Depends on material |
| Setup effort | 1-2 hours DIY | Ready to use |
| Expandability | Stack multiple bins | Fixed design |
Our recommendation: A bin cage is the best value option if you’re willing to spend 1-2 hours on setup. If aesthetics matter more than budget, commercial cages offer more design options. The ideal combination for many owners is a bin cage as the primary enclosure plus a small commercial travel cage for vet visits and temporary housing. For a full comparison of cage types, see our hamster cage setup guide and hamster cage review.
FAQ: Bin Cage Questions
Are bin cages good for hamsters?
Yes. When built correctly with adequate floor space, proper ventilation, and safe materials, a bin cage provides a better environment than most commercial cages in the same price range. The key is choosing the right size bin and never skipping the mesh lid.
How big should a bin cage be for a Syrian hamster?
The minimum floor space for a Syrian hamster is 100cm x 50cm (39” x 20”) — approximately 776 square inches (5,000 cm²). The IRIS 194 Quart bin at 33” x 18” (594 sq in) is the recommended choice. The 116 Quart bin at 25” x 17” (425 sq in) is the absolute minimum.
Can hamsters chew out of a bin cage?
IRIS WeatherPro bins use thick polycarbonate plastic that is very difficult for hamsters to chew through. However, always inspect the edges and corners, especially around any drilled holes. If you notice chewing damage, reinforce the area with duct tape or replace the bin.
Do I need a mesh lid for a bin cage?
Yes, absolutely. The original airtight lid provides zero ventilation. Without a mesh lid, condensation builds up inside the bin, humidity rises, and your hamster cannot breathe properly. This is the single most important safety modification — never skip it.
How often should I clean a bin cage?
Spot-clean soiled areas daily. Replace one-third to one-half of the bedding weekly. Do a full deep clean with complete bedding replacement every 2-3 weeks. The smooth plastic interior makes bin cages easy to wipe down.
Can I stack two bins for more space?
No. Vertical space does not replace floor space for hamsters. Hamsters are ground-dwellers and need horizontal running room, not height. A tall, narrow stacked bin setup does not meet their needs. One large bin is always better than two stacked small ones.
What size wheel do I need for a bin cage?
The same sizes as any other cage: 8.5 inches (21cm) minimum for Syrian hamsters — 10.5-12 inches recommended — and 8.5 inches for dwarf hamsters. The wheel must fit inside the bin with clearance above and on all sides. Check our hamster wheel size guide for detailed recommendations.
Conclusion
A bin cage is one of the most practical, cost-effective housing solutions available. With a $35 IRIS bin, some hardware cloth, and basic tools, you can build an enclosure that provides more floor space than cages costing three times as much.
Quick start checklist:
- Choose the right bin: IRIS 194 Quart for Syrians, IRIS 32 Quart for dwarfs
- Cut a mesh ventilation lid — never skip this step
- Install a water bottle and a properly sized wheel
- Add deep bedding and enrichment items
- Run through the safety checklist before introducing your hamster
For more hamster housing options and setup advice, explore our hamster cage setup guide and cage enrichment ideas.